As promised in our previous post, in this blog post we will describe the process of resolving conflicts occurred after installing a model.
Conflicts may appear after importing a model, if some of the elements included in the model are already in another model on the same layer. In that case, you can use the push option when importing the model:
(Windows PowerShell) –Conflict Push
(AxUtill) /conflict:push
The conflicting elements will be put into a new conflict model that is located in the patch layer for the current layer in the AOS. This new model will have a name that indicates it contains resources that have caused a conflict.
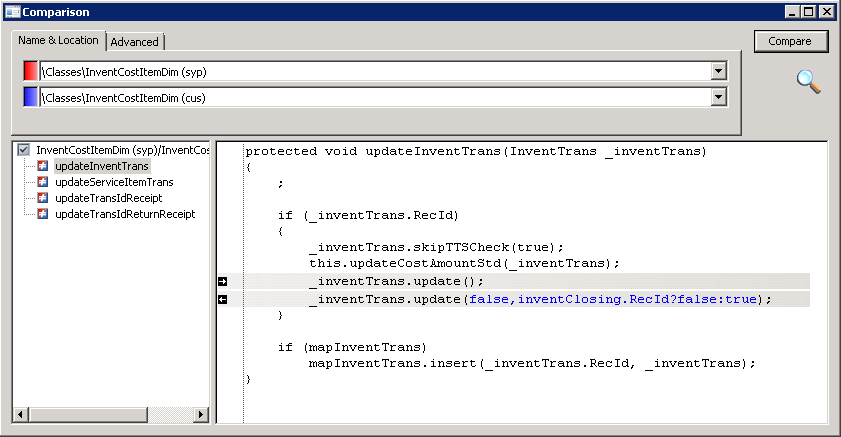
You can find the conflicting elements in this model and use the Compare tool to see the differences between the element in the path layer and the element in the main layer. Using that information and available actions from the Comparison form you can merge changes from the conflict model into an existing layer.
After you have resolved all of the conflicts, consider removing the conflict model from the patch layer. That way, somebody looking at the system will not assume that there are model conflicts that have to be resolved. If you are leaving a resource in the patch layer, move the resource out of the conflict model into another model in the patch layer. Then delete the conflict model.
Another scenario, where code conflicts may occur, is installing Cumulative updates or hotfixes (patch models) if the changes of affected elements may be over layered by customizations in higher layers.
Let’s assume that you are currently working on CUS layer. You have to install patch provided by ISV and this patch model will be installed in the ISP layer. You may potentially have changes on elements in ISP that are over layered/modified in CUS layer and code conflicts will be occurred between these layers.
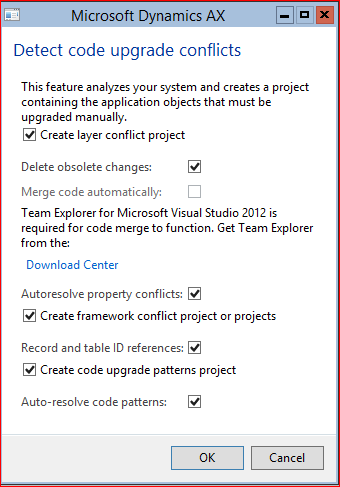
For resolving these conflicts, Detect code upgrade conflicts tool can be used from Tools – > Code upgrade

NOTE: Although no baseline database is required to run code pattern detection, analysis of layer conflicts requires that you configure a baseline database before you run this task.
Therefore, you need to create a baseline database from the database you’re using before installing the model, then you need to configure the baseline database on the AX server. Follow these steps to configure the baseline database:
- Close the Microsoft Dynamics AX client.
- Open the Microsoft Dynamics AX 2012 Server Configuration utility (Start> Administrative Tools > Microsoft Dynamics AX 2012 Server Configuration).
- If there is no editable configuration, create a new one.
- On theDatabase Connection tab, set the Baseline database name value so that it is the same as the Database name
- Restart AOS.
- Reopen the Microsoft Dynamics AX client, and continue with the upgrade.
Now, you can run the task for detecting code upgrade conflicts. After finishing, 3 projects may be included:
– Private project AxUpgradeLayerConflicts_<layer>
– Private project AxUpgradeRecIdConflicts_<layer>
– Private project AxUpgradeRuleConflicts_<layer>
In the project AxUpgradeLayerConflicts_<layer> you will find all elements that contain code conflicts and you can resolve them by using Compare tool


It is important to analyze the changes on both layers and conclude which lines need to be merged or removed on the higher layer.
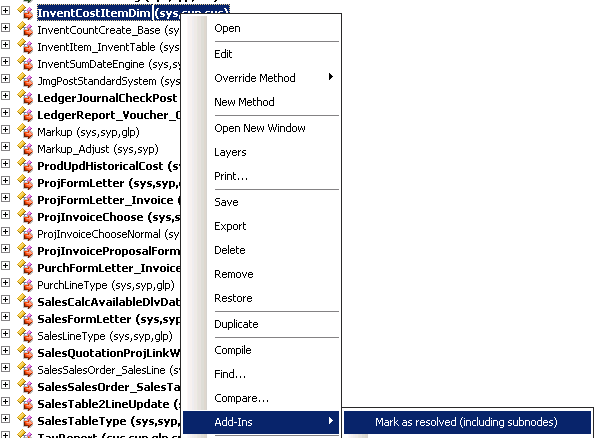
After resolving all conflicts for an element, save the changes and mark the element in the project as resolved.

related posts
April 5, 2024


hey man thanks for your article .But i have a problem wiht the Detect code Upgrade conflicts because the check that contain and create tje proj AXUPGRADELayerConflict_Cus dont appear . icant see this option and i need it to show the objects have a problems with the models imported
Good Post! Thank you so much for sharing this post, it was so good to read and use to improve my knowledge as an updated one, keep blogging…